
Figma Tokens
A single source truth again – finally
We all love Figma, don’t we!? Multiuser, blazingly fast and stable, global styles and component libraries, auto layout and 3rd party plugin API access. The latter made Figma Tokens possible and is bringing designers and developers closer together than anything else in the last decade.
Figma Tokens enables us to define design tokens other than color and typography (which Figma natively supports). It is finally possible to create tokens such as spacings, paddings, sizes, scales, shadows, gradients, … store them in markup and export them into whatever format you need, including CSS.
Why is this so significant? We now have synced design tokens in Figma and code, components built from the same design tokens in Figma and code and in the end complete page layouts of auto-layouted Figma components which look and scale similar to a coded web page.
Again, what’s the significancy? Consistency – and a real single source of truth – finally again! So now it’s possible to define design tokens, use them to build components and use those to build web pages.
If I change a design token in Figma Tokens, it changes the affected components in Figma, changes the tokens file, changes the CSS, changes the web page. End to end happiness. It’s even possible the other way around: If an engineer changes a value in CSS, it changes the tokens file which changes the component, which finally changes the design in Figma.
What do you need? Figma, the Figma Tokens plugin, Github, a code editor like Microsoft’s popular VS Code and some scripts. Sounds like a lot, but don’t panic …
If you know what Figma is, you’ll be fine, I’ll explain the rest. Let’s go!
Installation (Modern Macs only)
🤓 Disclaimer: I’m not a developer, I’m a designer. Some things I explain or do might not be best practice – but simple. My goal is to enable designers like me to experience the magic of Figma Tokens with as little development knowledge as possible/me. However, if something is wrong and could be done better, please approach me, I’m happy to update this article.
In Figma
- Install the Figma Tokens plugin: https://www.figma.com/community/plugin/843461159747178978/Figma-Tokens
On your Mac
- Install Microsoft’s VS Code: https://code.visualstudio.com/download
In the Terminal
- Open the Terminal app on your Mac.
- First, let’s see what shell your Terminal is using. Run
echo $0 - If the output says “-zsh”, you good to go, otherwise:
- If the output says “-bash”, then run
chsh -s /bin/zsh, type in your password and close and re-open the Terminal. Runecho $0again → Now it will say “-zsh” (This solely changed the default shell of your Terminal (the script language of your Terminal) and you can always switch back to BASH if you would want for any reason withchsh -s /bin/bash)
With ZSH running, do the following:
- Run
curl -o- https://raw.githubusercontent.com/nvm-sh/nvm/v0.39.1/install.sh | bash→ This downloads and installs NVM (Node Version Manager) on your Mac that enables you to easily install Node.js. It will take a few minutes, but when it’s finished, you’ll see a message to close and re-open the Terminal to use it. - ⚠️ Attention now: Copy these lines to your clipboard (not into Terminal!):
export NVM_DIR="$([ -z "${XDG_CONFIG_HOME-}" ] && printf %s "${HOME}/.nvm" || printf %s "${XDG_CONFIG_HOME}/nvm")" [ -s "$NVM_DIR/nvm.sh" ] && \\. "$NVM_DIR/nvm.sh" - With the above in your clipboard, type the following in Terminal and run:
pbpaste >> ~/.zshrc⚠️ Don’t copy-paste, you need the above text in your clipboard) → This creates a hidden file called “.zshrc” in your user’s home directory with the code you just copied into your clipboard. It tells Terminal to load NVM on startup. - To check if it worked. go into Finder and navigate into your home folder (or press “Command + Shift + H” on your keyboard) then press “Command + Shift + .” to display hidden files. There you should see your newly created hidden “.zshrc” file. (Press “Command + Shift + .” to hide hidden files again)
- Close and re-open the Terminal so it refreshes, then run
nvm install 16→ This installs Node.js Version 16 – very easy thanks to NVM. - Check if NVM and Node.js are installed by running
nvm --versionand afterwardsnode --version→ This should return version numbers formatted like X.X.X.
Phew, you’re done in Terminal. 😅 For troubleshooting on all of the above commands: https://github.com/nvm-sh/nvm#install–update-script or https://cheatcode.co/tutorials/how-to-install-node-js-and-manage-versions-with-nvm#installing-nvm-node-version-manager
Setup
On GitHub
- Create an account on https://github.com, if you don’t have one yet.
- Create a new GitHub repository. Let’s name it: “My Figma Tokens Test”. (GitHub will replace the spaces with dashes, that’s ok.)
- ⚠️ Select the option “Add a README file”.
- You can leave the rest of the available options like they are.
- Scroll down and hit “Create repository”.
In Figma
This will be the most simple project you’ve ever created. Its focus is syncing one single design token between Figma and a web page. Nothing more. In my next articles, I’ll cover how to build a “Design Token System” for a multi-brand design system and how to work together in a team using the Figma Tokens plugin. (Oh, pressure is on now! 😅)
In a new Figma file, create a simple button with a text-label and a background.
Open the Figma Tokens plugin (FT from now on) and add one single design token. For our example we only need one color token. In the “Colors” category, click “+”, name it “bg” and give it a nice color. 🚫 Do not convert colors or typography into Figma styles, this will not work! (at least not with the FT free version)
Select the background of your button and click on the “bg” token you just created in FT. This will apply the color to your button’s bg.
Now let’s connect FT to GitHub. In the FT, navigate to the “Settings” tab, then to the “GitHub” tab and “Add new credentials”:
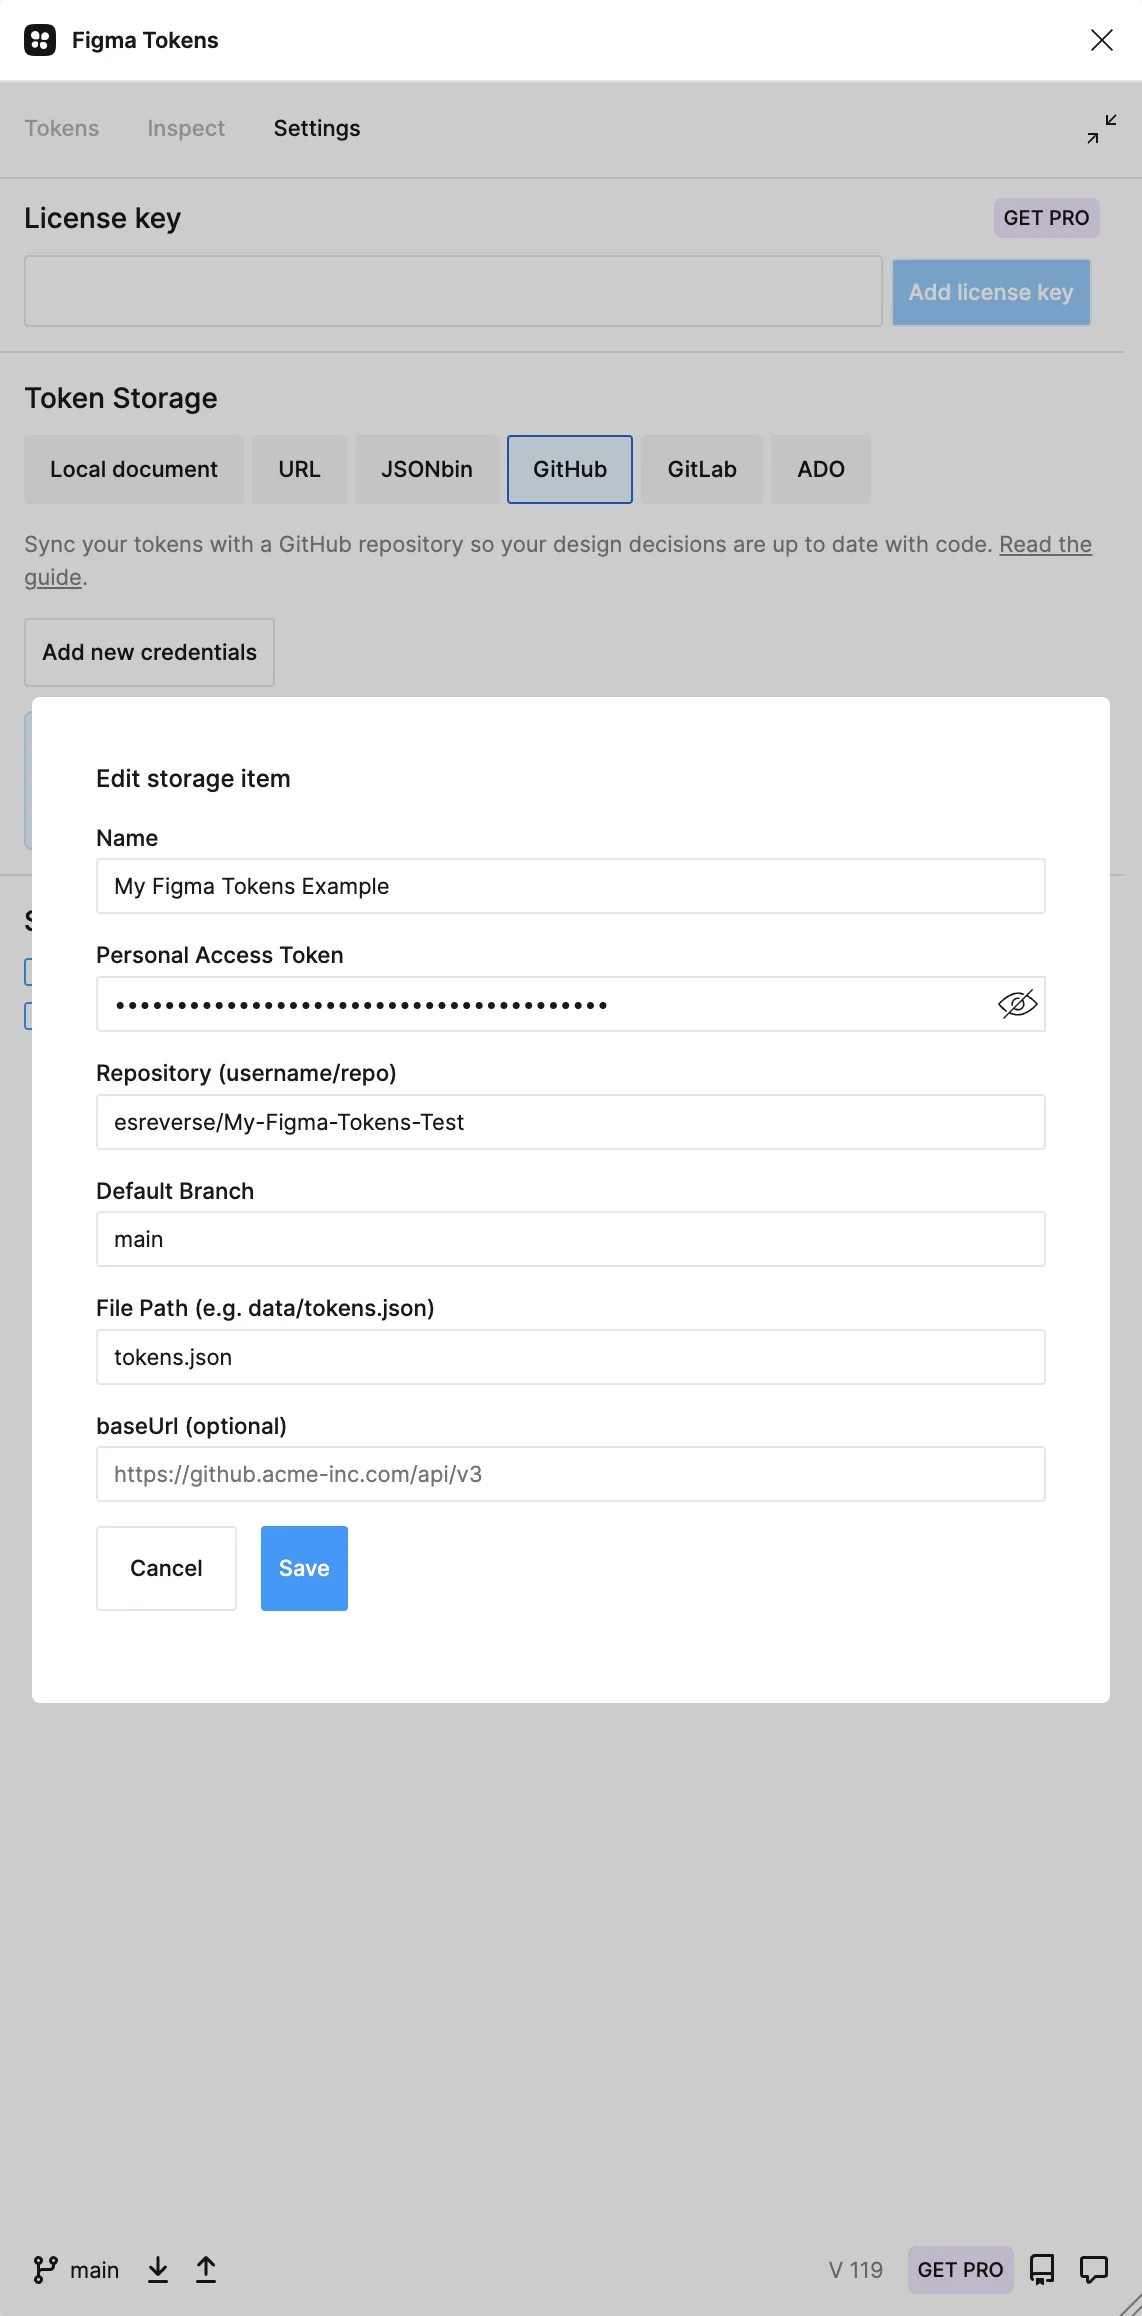
Name: Irrelevant, choose one you like.
Personal Access Token: You can get it in your GitHub settings. This link should work: https://github.com/settings/tokens. * Click the button “Generate a token” in the top right corner * Enter anything as a “Note” .e.g. “My Figma Tokens Test Token” * Set “Expiration” to “No expiration” * Select the “repo” checkbox (This will also select its 5 children) * Click “Generate token” on the bottom of the page. * From the confirmation page, copy the token and paste it into the FT GitHub settings (see screen above)
Repository: This is a combo of your GitHub username then ”/” then the repository name. Navigate to your repository and copy the username/repository part of the URL.
Default Branch: Keep it “main”.
File Path: “tokens.json”. It could basically have any name, but it has to match the Token Transformer action (explained later).
baseURL: Irrelevant.
Click “Save” and in the appearing overlay: Enter a “Commit message” like “My first commit” and click “Push”.
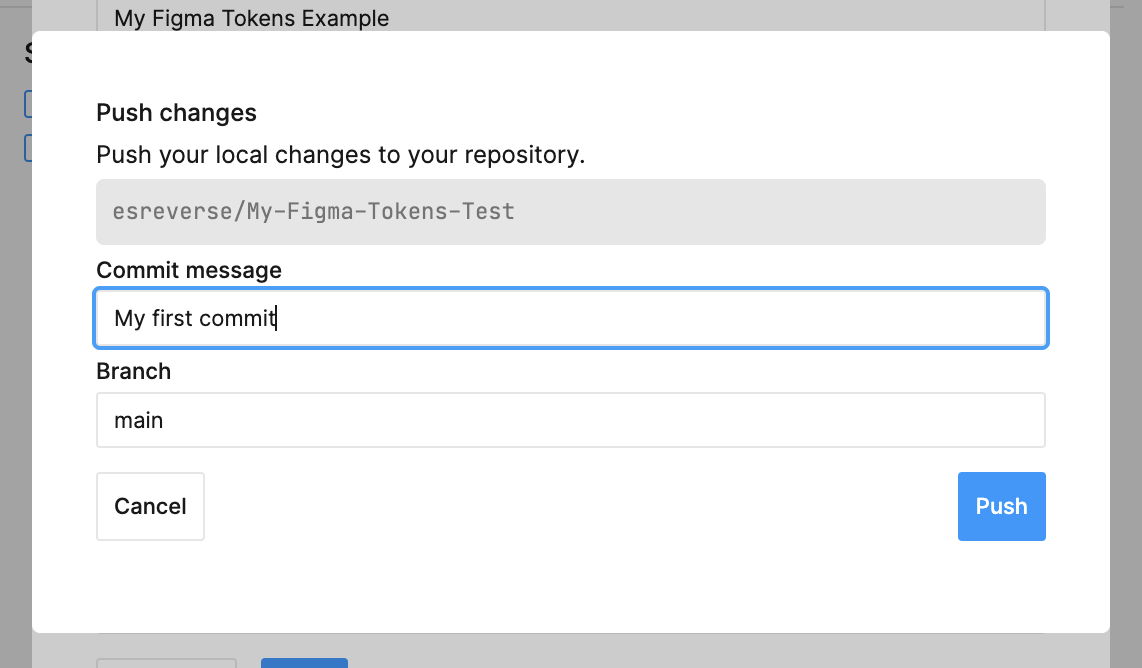
It will suggest to create a pull request. A pull request (PR) would basically be a request from you to the owner of the repository to pull (and merge) your changes into the “main” repository). Since we work directly on the “main” branch and not on another branch called e.g. “color-tests”, all of our PRs will directly be committed and merged with the “main” branch. So a PR is actually not needed (in our very simple example).
You just published your first tokens file! You can see it in your repository on GitHub. “tokens.json” is there, next to the “README.md”. Now it’s time to use it in code …
In VS Code
- Click on the link and install the GitHub extension in VS Code: https://code.visualstudio.com/docs/editor/github
- After you’ve installed it, the infamous GitHub cat icon appears in the left pane. Click it and sign in to GitHub.
- Then press “Command + Shift + P” to open the commands browser and type “clone”. From the list select “Git: Clone”, then click your way through to your Figma Tokens Test repository. Select a folder on your Mac where to store your repository. A modal is appearing in the bottom right corner asking you where to open it. Basically irrelevant. Select “Open”.
- Create an empty file named “.gitignore” in your project’s root folder (right-click → New File or in the menu: File → New File …), type
node_modulesin the first line and save it → This will prevent to sync the huge “node_modules” folder with GitHub. It’s only needed locally, so it can be excluded from up- and downloads.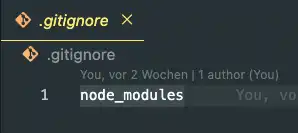
- Create another empty file in your project’s root folder and name it “index.html”. In the “index.html”, create a simple button:
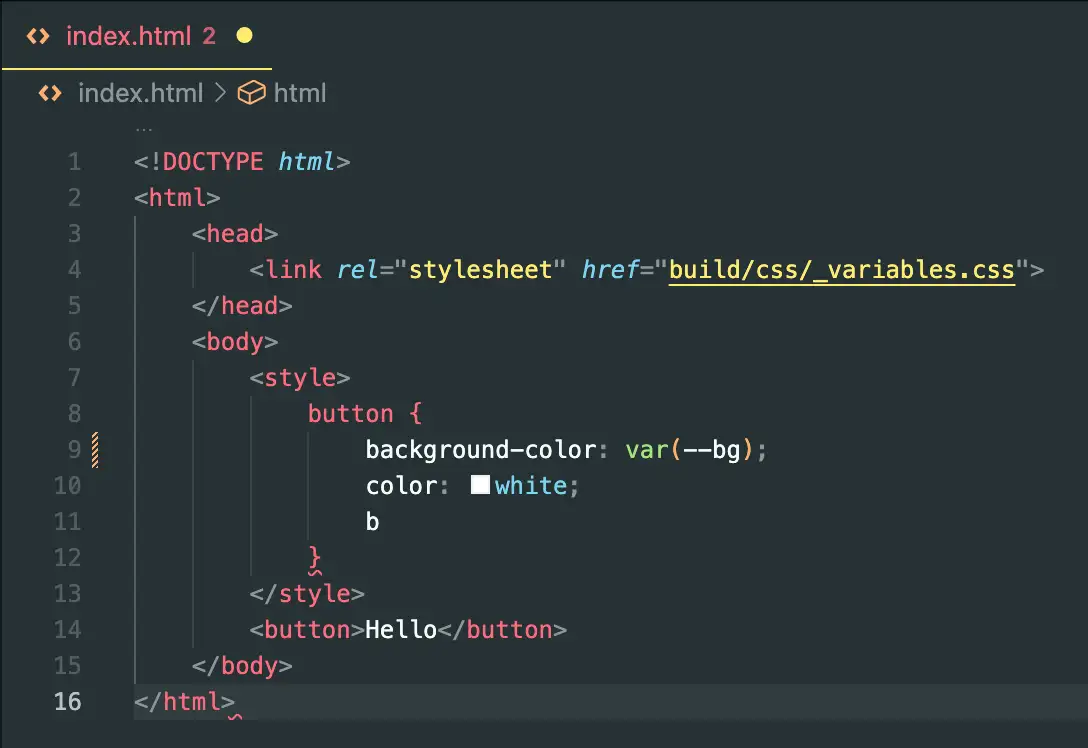
<!DOCTYPE html> <html> <head> <link rel="stylesheet" href="build/css/_variables.css"> </head> <body> <style> button { background-color: var(--bg); color: white; } </style> <button>Hello</button> </body> </html> - Navigate to your project folder on your Mac and find the “index.html”. Double click it. This will only show the outline of the button since we do not have yet defined the variable “—bg”, which will come from the FT file.
Install Token Transformer
Token Transformer converts the FT markup file into a format that Style Dictionary (see next section) can work with.
- Open a new terminal inside VS Code (Menu: Terminal → New Terminal). Look into the top right menu bar in the Terminal window and make sure you are running “zsh”. If it says “bash”, click the little “+” and open a “zsh” window.
- Run these commands one after another:
npm install token-transformernpx token-transformer tokens.json output.json- This converted all values form “tokens.json” into a new file called “output.json” and eliminated all variables, so “Style Dictionary” (see below) understands them.
You just installed your first NPM package and ran it!
Install Style Dictionary
Style Dictionary finally converts “output.json” (from above) into CSS.
- Open a new terminal window (you can find it in the menu)
- Run these commands one after another:
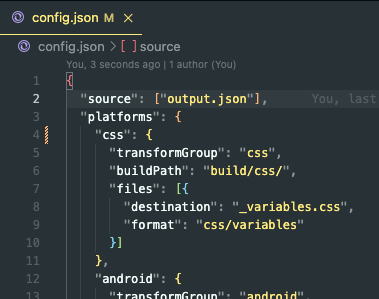
npm install -g style-dictionarystyle-dictionary init basic- Configure config.json
- Find the “config.json” file either in the “style-dictionary” or root folder of your project
- As “source”, we use “output.json” which was the output file for our Token Transformer action (see a few lines above)
- Then find the part where you see a few “scss” and rename them to “css” to create a CSS not a SCSS file. Style Dictionary can create all kinds of different formats for iOS android and many more, but we only need CSS.
- Run:
npx style-dictionary build→ This creates a few standard files and folders. Later, these files will be overwritten with your design token styles you defined in Figma. Exciting!
Setup Automation
Because we are lazy, let’s setup an automation that runs two scripts (Token Transformer & Style Dictionary) whenever we download (git pull) an updated version of the FT file from Github onto our Mac.
Run:
npm set-script build "token-transformer tokens.json output.json && npx style-dictionary build"This creates an alias named “build” that triggers two scripts (Token Transformer && Style Dictionary).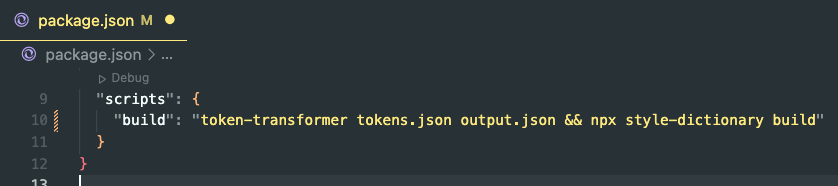
Optional: Install Husky (Git Hook)
If you are a fan of NPM packages now (like me), you can optionally install Husky, which will automate your workflow a little bit. It creates an automation that runs “build” each time you download updates from GitHub by entering git pull. Yes, a very tiny automization, but it’s a bit magical seeing it happen.
- Run:
npm install husky - Run:
npx husky add .husky/post-merge "npm run build" - Run:
git add .husky/post-mergeThis adds the hook to react to Git. - Now every time you run
git pullin your VS Code’s Terminal window, it checks if there is an update on GitHub. If there is an update, it pulls (downloads) all changes and afterwards automatically triggers the Git Hook and runsnpm run build.
Workflow
Now for the easy and fun part:
Figma to Code
This describes how changes of design tokens in FT change the affected components in Figma and then propagate over GitHub to CSS and in the end to your HTML page:
In Figma
- Make changes on a token in FT, maybe the bg-color we use in our button (right-click on the color token and “Edit Token”), which will change the bg-color of your button obviously → This will show a little blue notification dot next to the “Push to GitHub” button in the bottom-left corner.
- Click “Push to GitHub” and in the overlay enter a “Commit message” before hitting the “Push” button.
In VS-Code
- Git-Pull the changes, by running
git pullin the Terminal of your VS Code project. - If: Husky’s Git hooks are installed, our little “build” script runs automatically.
- Otherwise: Run Token Transformer and Style Dictionary by typing:
npm run build(see “Setup Automation” chapter above), then reload HTML page - BOOM! 🤩
Code to Figma
This describes how changes in code propagate over GitHub to FT in Figma and finally change the design of affected components in Figma.
😇 To be honest, this direction is not as end-to-end as it could be, since our two converters (Token Transformer and Style Dictionary) were only built to run in one direction: from Figma to CSS. In a larger project, you would probably store your tokens in Style Dictionary and use something like Backlight alongside.
In VS Code
- Change a token in “tokens.json”, maybe the bg-color we use in our button by replacing the number value to something like 100, 500 or 900. The {brackets} you see in the file are variables/references to values in the same file.
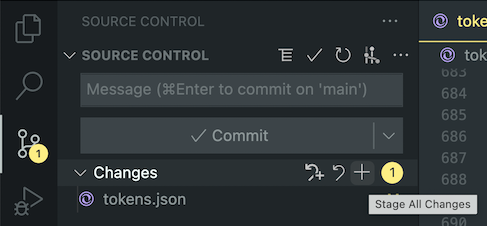
- Open the 3rd tab “SOURCE CONTROL” on the left side (see screenshot)
- Click the little “+” left of the yellow number to stage all your changes → This marks the files that will be committed to your Git repository with the next update
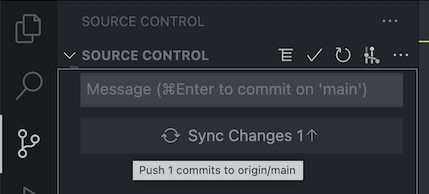
- Write a commit message like “Changed the button bg-color” and click “Commit” → This will create a “package” with the marked files together with a message so you (and your team) see what has changed

- Click “Sync Changes” → This finally uploads the “package” to your “My Figma Tokens Test” Git repository
In Figma
- Click “Pull from GitHub” in the bottom-left corner of FT
- BOOM! 🤩
Bonus Points
Syncing the background color of our button was obviously only the start. You could now try to add tokens for foreground color, typography for your button label, paddings and corner roundness – maybe even define different states for the button. And add all of these tokens to your button. Look here or there for a start.
Or with a little more trial and error, type a single letter directly in VS Code and see what code-completion offers you.

Look Mom!
Look what you’ve learned … You defined your first design token in code, created a new repository on GitHub, installed VS Code, NVM, Node.js and a few NPM packages, ran several lines of code in the Terminal, pushed, pulled and merged changes in GitHub like a maniac and ultimately synced design tokens between Figma and a web page.
Xzibit would say (90s meme! Watch out!): “You’ve officially been pimped!” You are now ready to create a full set of design tokens to use in components, create light and dark themes for your design system and (purple tentacle would say (again: 90s meme!)) “ready to conquer the world”. How?
Our next article is about “Creating & Crafting a Design Token System” for a multi-brand design system.